You must have one or more Groups in Tasklist to which you will assign users who can receive notifications and process responses from the Make An Inquiry feature.
1. Open the Internet Submissions window.
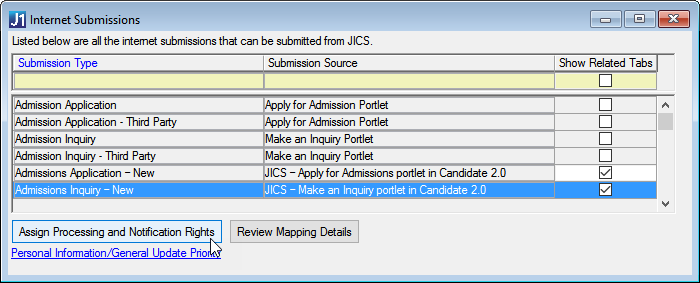
2. Locate and highlight the Submission Type of Admissions Inquiry - New.
3. Click the Assign Processing and Notification Rights button at the bottom of the window, which opens the Assign Processing and Notification Rights window.
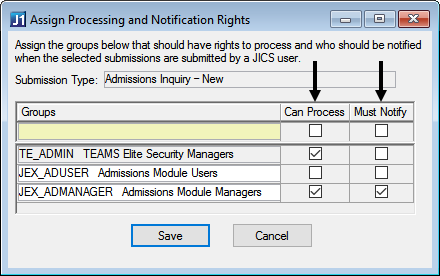
a. For those Groups you want to be allowed to process submissions from the Make An Inquiry feature, select the Can Process checkbox. If this checkbox is not selected, the Group cannot process responses from the feature.
b. For those Groups you want to receive notification of submissions from the Make An Inquiry feature, select the Must Notify check box. If this checkbox is selected, all users assigned to that Group with an email address defined in the Name Master table in J1 Desktop will receive an email message with the responses listed each time a submission is sent from the Make An Inquiry feature. If the checkbox is not selected, the Group will not receive email messages containing responses from the feature.
4. Save.
Configuration settings in campus portal can be done by roles with permission to access and administer global and portlet settings.
![]() |
If you are an administrator and need help setting up and configuring this feature, see the detailed setup sections below. |
After you add the Make an Inquiry feature to the page, it does not by default contain any introductory material. You must add text and images as appropriate.
1. Log in as the campus portal administrator.
2. From the Make an Inquiry feature, click Admin this portlet.
The Admin page appears.
3. Click Edit
the main screen content.
The Edit the portlet introduction page appears.
4. Edit the Link Label if necessary.
This is the link the candidate will see upon entering the feature. Clicking the link takes the candidate into the selected inquiry form.
5. To add an image to the feature:
a. Click
the Choose File button and
locate and select the image.
The file name appears in the Image
File field.
b. From the Image Placement options, choose where the image will appear on the feature.
6. To add text that will appear in the feature, enter it in the Text field. You can use the editing tools at the top of the text box to customize the appearance of the text.
7. Click Save.
The Admin page appears where you can do the following:
o Click the Activate a Form link to choose an inquiry form as the current inquiry form for the feature instance. Select the appropriate form and click the Choose Form button.
o Click
the Manage all inquiry forms
link to view a global list of all the inquiries in your system.
Deleting an inquiry here will delete it permanently from ALL features
(not just this one). Therefore, an inquiry that is in use in any feature
cannot be deleted here. To delete such an inquiry, first deactivate
it anywhere it is currently active. Once it is not displayed in any
features anywhere in the portal, you will have the option to delete
it. Keep in mind you may want to save your inquiries even after they
are not being used so you can import their settings, sections, and
questions into new inquiries in the future.
o Click the Add a new form link to create a new form.
Once a form has been activated, you can do the following:
§ Click the Deactivate this form link if you wish to remove the currently selected inquiry form from use with this feature instance.
§ Click the Activate a different inquiry form link if you would like to deactivate the current form and select a different existing form.
1. Log in to the campus portal as an administrator and navigate to the appropriate portal page.
2. From
the Admin Toolbar , click Access.
The Access page appears.
3. Click
on the campus portal role you are setting up permissions for. If the
role has not already been granted access to the page, click the button
to toggle it to Visible .
4. Additional permissions appear.
5. To grant administrative privileges to a campus portal role, click the button for the Allow this role to manage this page permission to move the toggle to "Yes". Administrative permissions will allow the users in the role to add or remove features and set page and feature level permissions.
6. From the in Make an Inquiry they can: section, use the toggle buttons set permissions.
To give this user role access
to a global operation on the page, click on the button next to the
global operation. The button toggles to Yes
to indicate that the role now has that permission.
To remove this user role's access
to a global operation on the page, click on the button next to the
global operation. The button toggles to No
to indicate that the role no longer has that permission.
Repeat for each permission option attached to the role.
Changes are saved automatically.
When the user clicks the Save and Finish Later button for a form (i.e., application form, inquiry form, etc.), the data is submitted to J1 Desktop only if the ???SendIncompleteForms??? option is set to On in the campus portal.
The Save and Finish Later option is not available for all submission types. If it is available, users will see a setting that allows them to turn the Save and Finish Later button on or off in the Basic Form Settings page.
To set the Send Incomplete Forms configuration options:
1. Log into the campus portal as an administrator.
2. Click the Site Manager link to open Site Manager. Example.
3. Click the ERP settings link on the side menu.
4. Click the On/Off toggle under Send incomplete forms to control the setting.
· If the toggle is moved to On, data will be transferred to the ERP when the user clicks the Save and Finish Later button.
· If the toggle is moved to Off, data will not be transferred to the ERP until the user clicks the Submit button when the form is completed.
5. Click Save.
6. Click Exit.